
After editing some music scores in Paint.net, see My Music Compositions page, I found that there were some advantages to just creating the whole score in Paint.net. I found a similar advantage with editing my floor plans. My simple floor plan software although Object Oriented (Vector Graphics) had many shortcomings and screen scaling limitations including having to be exported into a graphical format like jpeg, to share or publish, leaving a fixed size, with the text and some details blurred, so I edited and improved the looks with Paint.net., which is a Raster (Bitmapped or Pixel) based program. There are advantages to both but floor plans are much easier and better created with a (good) Vector program where objects can easily be moved about and scaled without losing resolution. But if you're just creating the occasional simple plan for yourself (and don't want or have time to learn a whole new program) and you're already familiar with Paint.net, then with some simple "tricks" and "workarounds" you can easily create good looking floor plans, all the while becoming even more adept with Paint.net.
The paradox is that now I prefer Paint.net for making floor plans as I find it easier to use and even more capable than my actual Floor Plan software.
Of course, like scoring music, the best way to demonstrate the tips and techniques would be with a video, so I may add some clips in the future. The fluid actions of creating, moving and sizing objects (and text) look so simple and easy when actually watching it happen, compared to the difficulty of reading the textual descriptions and then trying to translate them into your thoughts, as you may notice below, even though I've used some graphics.
And for doing any high resolution graphic work, (Floor Plans, Music Scores etc.) I have found that a larger monitor works better. (and for videos too) The good news is that 40" 1080P TVs can be found for under $300 and even 4K units are approaching that price too.
Here are some of the basic points that I will be discussing:
How to:
1) draw your floorplan to scale - up to 50 feet wide, any length
2) draw, scale and measure objects or distances to inch fractions
3) create and easily access your own library (furniture, appliances, etc.)
4) rotate (exactly 90°) and flip individual objects, or room sections, etc.
5) create perfect door swing arcs (or an arc of any length and size)
6) re-size (without distortion) existing objects and rooms etc.
7) later, after being placed, move objects, measurements, etc.
8) how to enter actual fractions - like ¾ (instead of 3/4) - see here
in the image. (note the Table size in feet)
How To Create Your Own Floor Plan With Paint.net
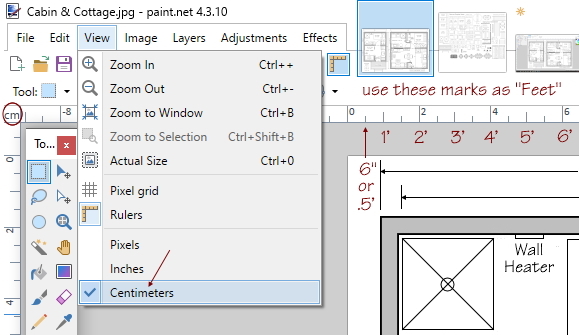
Paint.net does not have a customizable, scalable ruler for making scaled drawings and no such plug-in seems available. The three rulers supplied are just for the screen or printed paper size. For a floor plan, the inches are too small and would be cumbersome to try and scale up. (i.e. one inch equals one foot, etc.) Similarly, the pixel scale is either too small or large for a single building. The 12' Cabin above is 432 by 576 pixels, so 432 pixels equals 12 feet or 1 foot equals 32 pixels, which would make any conversion awkward and tedious. My screen's ruler only goes to 20 inches, so if you assumed each inch equals 1 foot, then it could just be used for small structures under 20' in width, but the cottage would have taken up the whole screen and all of my other house plans would not have been possible. This cabin (or a shed) would work with this scale, if that's all you are ever going to do, but if you wish to create a library, it won't easily scale up to larger buildings if you decide to do that later. But, the centimeter scale was almost perfect, if you consider each centimeter to be a foot, as I've shown in this first screen shot. Looking at the scale, it seems like it's only accurate to 6", but it's actually accurate to .33" or 1/3 of an inch.
There is more to learn, of course, which can be discovered by just practicing with the above tips and implementing them into your own methods, learning what works best for you.
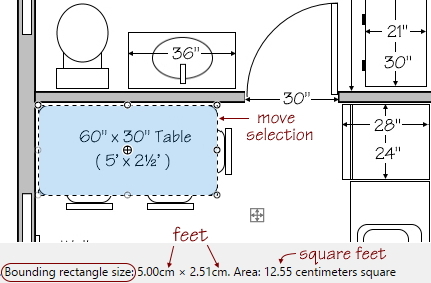
That's because the smallest movement that you can make on the screen (easier with the arrow keys) is one pixel and with the centimeter ruler that equals about one third of a millimeter which we will now assume, in our conversion, one third of an inch. So the width of the Table highlighted here, reads 2.51cm (or 25.1 millimeters as there are 10 millimeters in a centimeter.) But we don't have to concern ourselves with the metric scale, we are just reading the scale as feet. So 2.51cm equals 2.51 feet or 2' 6" because ½ of a foot is six inches. We don't concern ourselves with the one hundredth of a foot (.01) as it's insignificant and the cursor jumps ~three hundredths per pixel, as mentioned above, so you may sometimes get a .00 number like the 5.00cm shown, but often you won't.
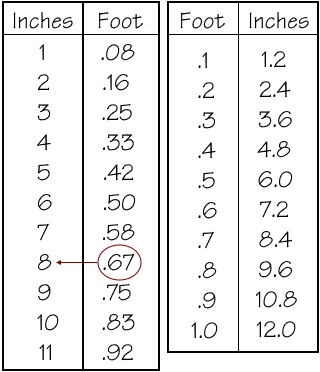
So I created the two charts here, which are in my Floor Plan Library, to help with these conversions. The first chart gives the even inches with the decimal/foot equivalent and the second chart gives the decimal (1/10) of a foot with the inches/decimal equivalent. So if the screen says 2.68cm, that means 2.68 feet. The first chart shows that .67 of a foot is 8 inches, so your measurement will be 2' 8" or 32".

1) How to Draw your Floor Plan to Scale
What Font Should I Use?
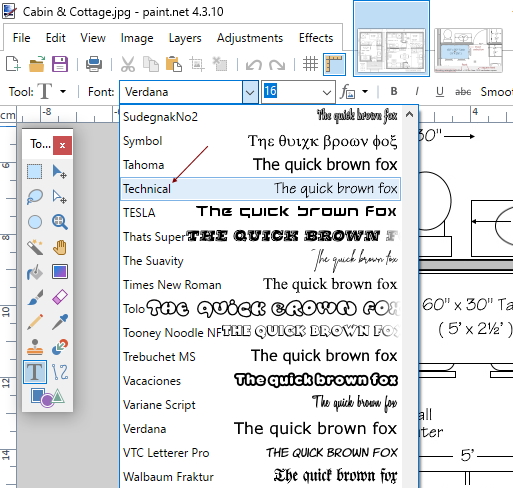
Because your plans can only be shown as images, then you can use any font, and not have to worry about how it will be translated by other computers that don't have that font installed. Some common ones used today are: Arial, Tahoma, Roman, Helvetica, Verdana and even Comic Sans.
I prefer a type of drafting or architectural lettering that was written by hand and established by architects long ago so that all writing on blueprints used uniform letters that were easy to read and therefore helped to avoid costly mistakes. The Technical font shown at the right is similar to what I was taught in high school drafting class in the 1960s and is what I use and have installed on my computers since the 1990s from a CD Rom. There are many Font Sites where you can download it for free, and other similar free ones, like Architect's Daughter, etc.
I set my default font (Paint.net, Word, Notepad etc. and my Web Design program (that you're reading now) to Verdana 16pt. as I use Paint.net for other things, but it's only two clicks to switch to "Technical" for a floor plan.
"As gold which he cannot spend will make no man rich,
so knowledge which he cannot apply will make no man wise."
Samuel Johnson


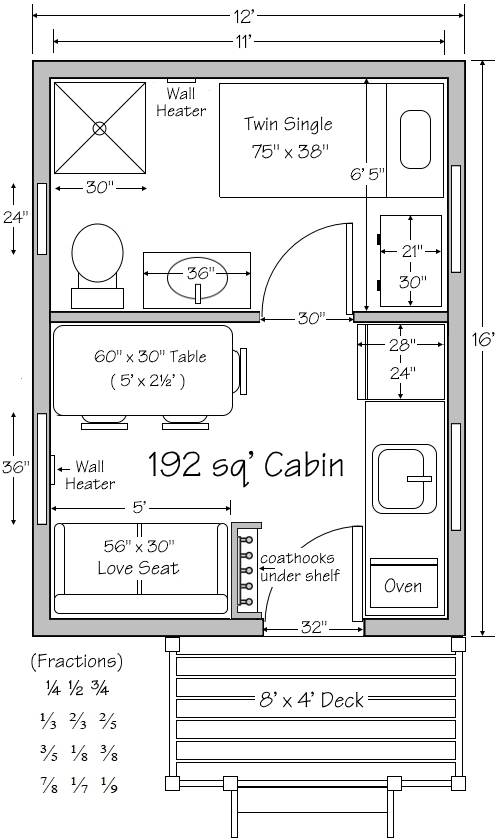
This Cabin plan
(with fractions added)
was cut from the previous image for easy reference here.